
 If you've found the material on this site useful, please consider purchasing this
e-book (only $10), which is based on the Python material in the tutorial. Doing so helps me
maintain and update this site. Thank you very much!
If you've found the material on this site useful, please consider purchasing this
e-book (only $10), which is based on the Python material in the tutorial. Doing so helps me
maintain and update this site. Thank you very much!
@markroseman
mark@markroseman.com
 Buy now for your Kindle
 Buy the DRM-free PDF
Essentials
- Tk Backgrounder
- Installing Tk
- Tutorial
- Widget Roundup
- Languages Using Tk
- Official Tk Command Reference
(Tcl-oriented; at www.tcl.tk)
Tutorial
Tk Concepts
With a first example behind you, you should have a basic idea of what a Tk program might look like and the types of tasks it needs to accomplish. We'll step back and look at three broad concepts that you need to know to understand Tk: widgets, geometry management, and event handling.
Widgets
Widgets are all the things that you see onscreen. In our example, we had a button, an entry, a few labels, and a frame. Others are things like checkboxes, tree views, scrollbars, text areas, and so on. Widgets are what are often referred to as "controls"; you'll also often see them referred to as "windows", particularly in Tk's documentation, a holdover from its X11 roots (so under that terminology, both a toplevel window and things like a button would be called windows).
Here is an example showing some of Tk's widgets, which we'll cover individually shortly.
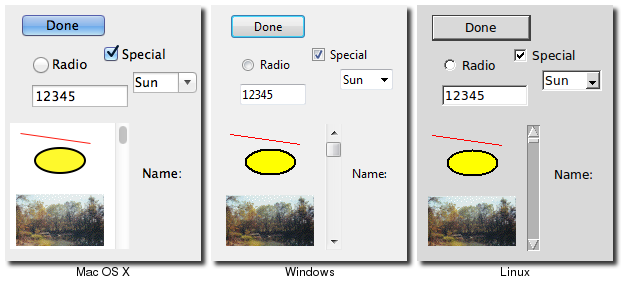
Several Tk Widgets.
Widget Classes
Widgets are objects, instances of classes that represent buttons, frames, and so on. So the first thing you'll need to do is identify the specific class of the widget you'd like to instantiate. This tutorial and the widget roundup will help with that.
Window Hierarchy
The other thing you'll need to know is the parent of the widget instance you'd like to create. In Tk, all widgets are part of a window hierarchy, with a single root at the top of the hierarchy. This hierarchy can be arbitrarily deep; so you might have a button in a frame in another frame within the root window. Even a new toplevel window is part of that same hierarchy, with it and all its contents forming a subtree of the overall window hierarchy.
In our metric conversion example, we had a single frame that was created as a child of the root window, and that frame had all the other controls as children. The root window was a container for the frame, and was therefore the frame's parent. The complete hierarchy for the example looked like this:
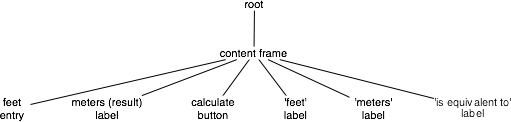
The window hierarchy of the metric conversion example.
Creating and Using Widgets
In Tcl, each widget is given an explicit pathname, which both differentiates it from other widgets, and also indicates its place in the window hierarchy. The root of the hierarchy, the toplevel widget that Tk automatically creates, is named simply "." (dot).
The frame, which was a child of the root, was named ".c". We could have put pretty much anything in place of the "c", naming it for example ".content". This name is purely for use by your program, so it's best to choose something meaningful. The controls that were children of the frame were given names like ".c.feet", ".c.meters", ".c.flbl", and so on. If there were any widgets at a deeper level of the hierarchy, we'd add another "." and then a unique identifier.
So to create a widget, we need to provide the widget class, and the pathname. The pathname is used to indicate the widget's parent (which must of course exist also), and hence its position in the window hierarchy. For example:
ttk::button .b
ttk::frame .f
ttk::entry .f.entry
This also creates a new object command with the same name as the widget's pathname, which will let us communicate with the widget. So the above code would produce new Tcl commands named ".b", ".f", ".f.entry", and so on. You can then use that object command to communicate further with the widget, calling e.g. ".b invoke", or ".f.entry state disabled". Because of the obvious parallels with many object-oriented systems, we'll often refer to the object commands as objects, and calls on those objects (like the "invoke") as method calls. For example, you'll see below the use of the "configure" and "cget" methods.
Each separate widget is a Ruby object. When creating a widget, you must pass its parent as a parameter to the widget class' "new" method. The only exception is the "root" window, which is the toplevel window that will contain everything else. That is instantiated from the TkRoot class, and it does not have a parent. For example:
root = TkRoot.new
content = Tk::Tile::Frame.new(root)
Tk::Tile::Button.new(content)
Whether or not you save the widget object in a variable is entirely up to you, and depends of course whether you'll need to refer to it later. Because the object is inserted into the widget hierarchy, it won't be garbage collected even if you don't keep your own reference to it.
If you snuck a peak at how Tcl manages widgets, you'll see each widget has a specific pathname; you'll also see this pathname referred to in Tk reference documentation. RubyTk chooses and manages all these pathnames for you behind the scenes, so you should never have to worry about them. If you do though, you can get the pathname from a widget with its "path" method.
In Perl, each widget is given an explicit pathname, which both differentiates it from other widgets, and also indicates its place in the window hierarchy. The root of the hierarchy, the toplevel widget that Tk automatically creates, is named simply "." (dot).
The frame, which was a child of the root, was named ".c". We could have put pretty much anything in place of the "c", naming it for example ".content". This name is purely for use by your program, so it's best to choose something meaningful. The controls that were children of the frame were given names like ".c.feet", ".c.meters", ".c.flbl", and so on. If there were any widgets at a deeper level of the hierarchy, we'd add another "." and then a unique identifier.
So to create a widget, we need to provide the widget class, and the pathname. The pathname is used to indicate the widget's parent (which must of course exist also), and hence its position in the window hierarchy. For example:
Tkx::ttk__button(".b", -text => "hello");
Tkx::ttk__frame(".f");
Tkx::ttk__entry(".f.entry");
Widget Objects
Many widgets have operations that you can call on them, such as to disable a widget, invoke a button's command, and so on. If we were doing this in Tcl, we'd write something like ".b invoke" or ".f.entry state disabled". Essentially you'd think of ".b" or ".f.entry" as objects, and "invoke" and "state" as methods, the latter having a single parameter "disabled". In Perl, you can call the exact Tcl command like this:
Tkx::i::call(".b", "invoke");
Tkx::i::call(".f.entry", "state", "disabled");
Admittedly, that's pretty lame. Ideally, we'd want to have these widgets behave just like Perl objects. Luckily, Tkx lets us do exactly that.
The first thing we need to do is get a reference to an object for these widgets. We can do that like this, passing the widget path name to "Tkx::widget->new":
my $b = Tkx::widget->new(".b");
my $e = Tkx::widget->new(".f.entry");
Then we can invoke methods on these objects just how you'd expect:
$b->invoke;
$e->state("disabled");
Creating each widget and then getting a reference to it as a separate step is a bit much. So there's another way to create widgets. If you have an object reference to the parent widget in the widget hierarchy, you can ask it to create a child.
my $mw = Tkx::widget->new(".");
my $b = $mw->new_ttk__button(-text => "hello");
my $f = $mw->new_ttk__frame;
my $e = $f->new_ttk__entry;
In this case, Tkx will choose the widget pathname for you (it'll look something like ".b", ".f.e", ".f.e2", etc.).
You can get this path by calling the object's "_mpath" method (e.g. "$b->_mpath"). If you stringify the object itself (e.g. trying to print it out), it will also be the widget pathname.
You also saw in our earlier example that some Tkx commands (like "grid") take the widget pathname as their first argument. There's a way to do that using the widget object instead. We invoke a method which is the name of the command, prefixed by "g_", e.g. "g_grid". So this:
Tkx::ttk__entry(".c.feet", -width => 7, -textvariable => \$feet);
Tkx::grid(".c.feet", -column => 2, -row => 1, -sticky => "we");
becomes this:
my $mw = Tkx::widget->new(".");
my $ft = $mw->new_ttk__entry(-width => 7, -textvariable => \$feet);
$ft->g_grid(-column => 2, -row => 1, -sticky => "we");
Translation Rules
What's somewhat scary about the Tkx module is that it implements all of this on a purely syntactic level. That is, it has no clue about buttons and entries and grid. It just knows that if it sees a method "new_something" it's creating a widget using the Tcl command "something", or if you call a method "g_otherthing", that it's going to invoke a Tcl command "otherthing", and pass the widget pathname associated with the object as a first parameter (followed by any other parameters passed to the method).
It's this pure syntactic mapping which gives Tkx its power and amazing brevity (check out the code in Tkx.pm!). It also explains why it can automatically track any changes in Tk. Any new commands and options don't need to be explicitly implemented in Tkx code; they are automatically available just by using the right syntax.
Now let's talk about those underscores in the Tkx commands and method names. If you've glanced at the Tcl version of the code in this tutorial, you know that they can take several forms, i.e.
- a single toplevel command, like "grid"
- a multi-word command (called an ensemble in Tcl), e.g. "wm title"
- a command in a namespace, e.g. "ttk::button"
- a single toplevel command with underscores, e.g. "tk_messageBox"
No translations are needed for simple commands like "grid", but the others need to be tweaked. To translate these into Perl, Tkx uses underscores in the following way:
- a single underscore is replaced with a space, e.g. "wm_title" in Perl becomes "wm title" in Tcl
- two underscores is replaced with the namespace qualifier "::", e.g. "ttk__button" becomes "ttk::button"
- three underscores is replaced with a single underscore, e.g. "tk___messageBox" becomes "tk_messageBox"
Given that this purely syntactic translation is all that Tkx does, let's state the obvious: whether or not you use the pure command form, which we used in the "feet to meters" example, or the object oriented form, they both do exactly the same thing (i.e. invoke the same underlying Tcl command).
Because you can get an object's widget pathname, or get an object reference from a widget pathname, you can also freely intermix them. Most programs of any length will probably be a bit simpler if they predominately use the object oriented form, but this is almost entirely a stylistic issue.
Feet to Meters, Object Style
Here's the earlier "feet to meters" example, this time rewritten in the object oriented style. The programs do exactly the same thing.
use Tkx;

my $mw = Tkx::widget->new(".");
$mw->g_wm_title("Feet to Meters");
my $frm = $mw->new_ttk__frame(-padding => "3 3 12 12");
$frm->g_grid(-column => 0, -row => 0, -sticky => "nwes");
$mw->g_grid_columnconfigure(0, -weight => 1);
$mw->g_grid_rowconfigure(0, -weight => 1);

my $ef = $frm->new_ttk__entry(-width => 7, -textvariable => \$feet);
$ef->g_grid(-column => 2, -row => 1, -sticky => "we");
my $em = $frm->new_ttk__label(-textvariable => \$meters);
$em->g_grid(-column => 2, -row => 2, -sticky => "we");
my $cb = $frm->new_ttk__button(-text => "Calculate", -command => sub {calculate();});
$cb->g_grid(-column => 3, -row => 3, -sticky => "w");

$frm->new_ttk__label(-text => "feet")->g_grid(-column => 3, -row => 1, -sticky => "w");
$frm->new_ttk__label(-text => "is equivalent to")->g_grid(-column => 1, -row => 2, -sticky => "e");
$frm->new_ttk__label(-text => "meters")->g_grid(-column => 3, -row => 2, -sticky => "w");

foreach (Tkx::SplitList($frm->g_winfo_children)) {
    Tkx::grid_configure($_, -padx => 5, -pady => 5);
}
$ef->g_focus;
$mw->g_bind("<Return>", sub {calculate();});

sub calculate {
   $meters = int(0.3048*$feet*10000.0+.5)/10000.0 || '';
}

Tkx::MainLoop();
Each separate widget is a Python object. When creating a widget, you must pass its parent as a parameter to the widget creation function. The only exception is the "root" window, which is the toplevel window that will contain everything else. That is automatically created, and it does not have a parent. For example:
root = Tk()
content = ttk.Frame(root)
button = ttk.Button(content)
Whether or not you save the widget object in a variable is entirely up to you, and depends of course whether you'll need to refer to it later. Because the object is inserted into the widget hierarchy, it won't be garbage collected even if you don't keep your own reference to it.
If you snuck a peak at how Tcl manages widgets, you'll see each widget has a specific pathname; you'll also see this pathname referred to in Tk reference documentation. Tkinter chooses and manages all these pathnames for you behind the scenes, so you should never have to worry about them. If you do though, you can get the pathname from a widget by calling "str(widget)".
Configuration Options
All widgets also have a number of different configuration options, which generally control how they are displayed or how they behave.
The options that are available depend upon the widget class of course. There is a lot of consistency between different widget classes, so options that do pretty much the same thing tend to be named the same. So both a button and a label have a "text" option to adjust the text the widget displays, while a scrollbar for example would not have a "text" option since it's not needed. In the same way, the button has a "command" option telling it what to do when pushed, while a label, which holds just static text, does not.
Configuration options can be set when the widget is first created, by passing along the names and values of the options as optional parameters. You can later check what the value of those options are, and with a very small number of exceptions, change them at any time. If you're not sure what all the different options are for a widget, you can ask the widget to provide it. This gives you a long list of all the options, and for each option, you can see the name of the option and its current value (along with three other attributes which you won't normally need to worry about).
This is all best illustrated with the following interactive dialog with the interpreter.
% wish8.5
create a button, passing two options:
% grid [ttk::button .b -text "Hello" -command {button_pressed}]
check the current value of the text option:
% .b cget -text
Hello
check the current value of the command option:
% .b cget -command
button_pressed
change the value of the text option:
% .b configure -text Goodbye
check the current value of the text option:
% .b cget -text
Goodbye
get all information about the text option:
% .b configure -text
-text text Text {} Goodbye
get information on all options for this widget:
% .b configure
{-takefocus takeFocus TakeFocus ttk::takefocus ttk::takefocus}
{-command command Command {} button_pressed} {-default default Default normal normal}
{-text text Text {} Goodbye} {-textvariable textVariable Variable {} {}}
{-underline underline Underline -1 -1} {-width width Width {} {}} {-image image Image {} {}}
{-compound compound Compound none none} {-padding padding Pad {} {}}
{-state state State normal normal} {-takefocus takeFocus TakeFocus {} ttk::takefocus}
{-cursor cursor Cursor {} {}} {-style style Style {} {}} {-class {} {} {} {}}
% irb
irb(main):001:0> require 'tk'
=> true
irb(main):002:0> require 'tkextlib/tile'
=> true
create a button, passing two options:
irb(main):003:0> root = TkRoot.new
=> #<TkRoot:0xb7c8c9d8 @path=".">
irb(main):004:0> button = Tk::Tile::Button.new(root) {text "Hello"; command "button_pressed"}.grid
=> #<Tk::Tile::TButton:0xb7c86ab0 @cmdtbl=["c00001"], @path=".w00000">
check the current value of the text option:
irb(main):005:0> button['text']
=> "Hello"
check the current value of the command option:
irb(main):006:0> button['command']
=> #<cb_entry:fdbe42342>
change the value of the text option:
irb(main):007:0> button['text'] = 'goodbye'
=> "goodbye"
check the current value of the text option:
irb(main):008:0> button['text']
=> "goodbye"
get all information about the text option:
irb(main):009:0> button.configinfo 'text'
=> ["text", "text", "Text", "", "goodbye"]
get information on all options for this widget:
irb(main):010:0> button.configinfo
=> [["takefocus", "takeFocus", "TakeFocus", true, true], ["command", "command", "Command", "", #],
["default", "default", "Default", "normal", "normal"], ["text", "text", "Text", "", "goodbye"],
 ["textvariable", "textVariable", "Variable", nil, nil],
["underline", "underline", "Underline", -1, -1], ["width", "width", "Width", "", ""],
["image", "image", "Image", "", ""], ["compound", "compound", "Compound", "none", "none"],
["padding", "padding", "Pad", "", ""], ["state", "state", "State", "normal", "normal"],
["takefocus", "takeFocus", "TakeFocus", nil, true], ["cursor", "cursor", "Cursor", "", ""],
["style", "style", "Style", [], []], ["class", "", "", "", ""]]
run Perl interactively using the program "psh":
% psh
Perl> use Tkx
Perl> $mw = Tkx::widget->new(".")
.
create a button, passing two options:
Perl> ($b = $mw->new_ttk__button(-text => "Hello", -command => sub {button_pressed();}))->g_grid
.b
check the current value of the text option:
  (note that "m_<foo>" is another one of those magic Tkx translations
   like "g_<foo>"; in this case it means call the <foo> method on the object)
Perl> $b->m_cget(-text)
Hello
conveniently, the "m_" part is almost always optional:
Perl> $b->cget(-text)
Hello
check the current value of the command option:
Perl> $b->cget(-command)
::perl::CODE(0x839020)
change the value of the text option:
Perl> $b->configure(-text => "Goodbye")

check the current value of the text option:
Perl> $b->cget(-text)
Goodbye
get all information about the text option:
Perl> $b->configure(-text)
-text text Text {} Goodbye
convert the Tcl list this returns into a Perl list:
Perl> Tkx::SplitList($b->configure(-text))
-text, text, Text, , Goodbye
get information on all options for this widget:
Perl> $b->configure
{-takefocus takeFocus TakeFocus ttk::takefocus ttk::takefocus}
{-command command Command {} ::perl::CODE(0x839020)} {-default default Default normal normal}
{-text text Text {} Goodbye} {-textvariable textVariable Variable {} {}}
{-underline underline Underline -1 -1} {-width width Width {} {}} {-image image Image {} {}}
{-compound compound Compound none none} {-padding padding Pad {} {}}
{-state state State normal normal} {-takefocus takeFocus TakeFocus {} ttk::takefocus}
{-cursor cursor Cursor {} {}} {-style style Style {} {}} {-class {} {} {} {}}
% python
>>> from tkinter import *
>>> from tkinter import ttk
>>> root = Tk()
create a button, passing two options:
>>> button = ttk.Button(root, text="Hello", command="buttonpressed")
>>> button.grid()
check the current value of the text option:
>>> button['text']
'Hello'
change the value of the text option:
>>> button['text'] = 'goodbye'
another way to do the same thing:
>>> button.configure(text='goodbye')
check the current value of the text option:
>>> button['text']
'goodbye'
get all information about the text option:
>>> button.configure('text')
('text', 'text', 'Text', '', 'goodbye')
get information on all options for this widget:
>>> button.configure()
{'cursor': ('cursor', 'cursor', 'Cursor', '', ''), 'style': ('style', 'style', 'Style', '', ''),
'default': ('default', 'default', 'Default', <index object at 0x00DFFD10>, <index object at 0x00DFFD10>),
'text': ('text', 'text', 'Text', '', 'goodbye'), 'image': ('image', 'image', 'Image', '', ''),
'class': ('class', '', '', '', ''), 'padding': ('padding', 'padding', 'Pad', '', ''),
'width': ('width', 'width', 'Width', '', ''),
'state': ('state', 'state', 'State', <index object at 0x0167FA20>, <index object at 0x0167FA20>),
'command': ('command', 'command' , 'Command', '', 'buttonpressed'),
'textvariable': ('textvariable', 'textVariable', 'Variable', '', ''),
'compound': ('compound', 'compound', 'Compound', <index object at 0x0167FA08>, <index object at 0x0167FA08>),
'underline': ('underline', 'underline', 'Underline', -1, -1),
'takefocus': ('takefocus', 'takeFocus', 'TakeFocus', '', 'ttk::takefocus')}
Geometry Management
If you've been playing around creating widgets, you've probably noticed that just by creating them they didn't end up showing up onscreen. Having things actually put in the onscreen window, and precisely where in the window they show up is a separate step called geometry management.
In our example, this positioning was accomplished by the "grid" command, where we passed along the column and row we wanted each widget to go in, how things were to be aligned within the grid, and so on. Grid is an example of a geometry manager (of which there are several in Tk, grid being the most useful). We'll talk about grid in detail in a later chapter, but for now we'll look at geometry management in general.
A geometry manager's job is to figure out exactly where those widgets are going to be put. This turns out to be a very difficult optimization problem, and a good geometry manager relies on quite complex algorithms. A good geometry manager provides the flexibility, power and ease of use that makes programmers happy, and Tk's "grid" is without a doubt one of the absolute best. A poor geometry manager... well, all the Java programmers who have suffered through "GridBagLayout" please raise their hands.
The Problem
The problem for a geometry manager is to take all the different widgets the program creates, plus the instructions for where in the window the program would like things to go (explicitly, or more often, relative to other widgets), and then actually put them in the window.
In doing so, the geometry manager has to balance a number of different constraints:
- The widgets may have a "natural" size (e.g. the natural width of a label would normally be determined by the text and font in it), but the toplevel all these different widgets are trying to fit into isn't big enough to accommodate them; the geometry manager must decide which widgets to shrink to fit, by how much, etc.
- If the toplevel window is bigger than the natural size of all the widgets, how is the extra space used? Is it just used for extra space between widgets, and if so, how is that space distributed? Is it used to make certain widgets bigger than they normally want to be?
- If the toplevel window is resized, how does the size and position of the widgets in it change? Will certain areas (e.g. a text entry area) expand or shrink, while other parts stay the same size, or is the area distributed differently? Do certain widgets have a minimum (or maximum) size that you want to avoid going under (over)?
- How can widgets in different parts of the user interface be aligned with each other, to present a clean layout and match platform guidelines to do with inter-widget spacing?
- For a complex user interface, which may have many frames nested in other frames nested in the window (etc.), how can all the above be accomplished, trading off the conflicting demands of different parts of the entire user interface?
How it Works
Geometry management in Tk relies on the concept of master and slave widgets. A master is a widget, typically a toplevel window or a frame, which will contain other widgets, which are called slaves. You can think of a geometry manager as taking control of the master widget, and deciding what will be displayed within.
The geometry manager will ask each slave widget for its natural size, or how large it would ideally like to be displayed. It then takes that information and combines it with any parameters provided by the program when it asks the geometry manager to manage that particular slave widget. In our example, we passed grid a "column" and "row" number for each widget, which indicated the relative position of the widget with respect to others, and also a "sticky" parameter to suggest how the widget should be aligned or possibly stretched. We also used "columnconfigure" and "rowconfigure" to indicate the columns and rows we'd like to have expand if there is extra space available in the window. Of course, all these parameters are specific to grid; other geometry managers would use different ones.
The geometry manager takes all the information about the slaves, as well as the information about how large the master is, and uses its internal algorithms to determine the area each slave will be allocated (if any!). The slave is then responsible for drawing etc. within that particular rectangle. And of course, any time the size of the master changes (e.g. because the toplevel window was resized), the natural size of a slave changes (e.g. because we've changed the text in a label), or any of the geometry manager parameters change (e.g. like "row", "column", or "sticky") we repeat the whole thing.
This all works recursively as well. In our example, we had a content frame inside the toplevel window, and then a number of other controls in the content frame. We therefore had a geometry manager working on two different masters. At the outer level, the toplevel window was the master, and the content frame was the slave. At the inner level, the content frame was the master, with each of the other widgets being slaves. So the same widget can be both a master and a slave. This hierarchy can of course also be nested much more deeply.
While each master can have only one geometry manager (e.g. grid), it's entirely possible for different masters to have different geometry managers; while grid is generally used, others may make sense for a particular layout used in one part of your user interface. Also, we've been making the assumption that slave widgets are the immediate children of their master in the widget hierarchy. While this is usually the case, and mostly there's no good reason to do it any other way, it's also possible (with some restrictions) to get around this.
Event Handling
In Tk, as in most other user interface toolkits, there is an event loop which receives events from the operating system. These are things like button presses, keystrokes, mouse movement, window resizing, and so on.
Generally, Tk takes care of managing this event loop for you. It will figure out what widget the event applies to (did the user click on this button? if a key was pressed, which textbox had the focus?), and dispatch it accordingly. Individual widgets know how to respond to events, so for example a button might change color when the mouse moves over it, and revert back when the mouse leaves.
Command Callbacks
Often though you want your program to handle particular events, for example doing something when a button is pushed. For those events that are pretty much essential to customize (what good is a button without something happening when you press it?), the widget will provide a callback as a widget configuration option. We saw this in the example with the "command" option of the button.
Callbacks in Tk tend to be simpler than in toolkits used with compiled languages (where a callback must generally be directed at a procedure with a certain set of parameters or an object method with a certain signature). Instead, the callback is just a normal bit of code that the interpreter evaluates. While it can be as complex as you want to make it, most times though you'll just want your callback to call some other procedure.
Event Bindings
For events that don't have a command callback associated with them, you can use Tk's "bind" to capture any event, and then (like with callbacks) execute an arbitrary piece of code.
Here is a (silly) example that shows how a label can have bindings set up for it to respond to different events, which it does so by just changing what is displayed in the label.
package require Tk
grid [ttk::label .l -text "Starting..."]
bind .l <Enter> {.l configure -text "Moved mouse inside"}
bind .l <Leave> {.l configure -text "Moved mouse outside"}
bind .l <1> {.l configure -text "Clicked left mouse button"}
bind .l <Double-1> {.l configure -text "Double clicked"}
bind .l <B3-Motion> {.l configure -text "right button drag to %x %y"}
Note that the bind command lives in the global namespace; there is not a ttk::bind command.
require 'tk'
require 'tkextlib/tile'
root = TkRoot.new
l = Tk::Tile::Label.new(root) {text "Starting..."}.grid
l.bind("Enter") {l['text'] = "Moved mouse inside"}
l.bind("Leave") {l['text'] = "Moved mouse outside"}
l.bind("1") {l['text'] = "Clicked left mouse button"}
l.bind("Double-1") {l['text'] = "Double clicked"}
l.bind("B3-Motion", proc{|x,y| l['text'] = "right button drag to #{x} #{y}"}, "%x %y")
Tk.mainloop
use Tkx;
my $mw = Tkx::widget->new(".");
(my $l = $mw->new_ttk__label(-text => "Starting..."))->g_grid;
$l->g_bind("<Enter>",     sub {$l->configure(-text => "Moved mouse inside")});
$l->g_bind("<Leave>",     sub {$l->configure(-text => "Moved mouse outside")});
$l->g_bind("<1>",         sub {$l->configure(-text => "Clicked left mouse button")});
$l->g_bind("<Double-1>",  sub {$l->configure(-text => "Double clicked")});
$l->g_bind("<B3-Motion>", [sub { my($x,$y) = @_;
                                 $l->configure(-text => "right button drag to $x $y")
	                   }, Tkx::Ev("%x", "%y")]);
Tkx::MainLoop();
from tkinter import *
from tkinter import ttk
root = Tk()
l =ttk.Label(root, text="Starting...")
l.grid()
l.bind('<Enter>', lambda e: l.configure(text='Moved mouse inside'))
l.bind('<Leave>', lambda e: l.configure(text='Moved mouse outside'))
l.bind('<1>', lambda e: l.configure(text='Clicked left mouse button'))
l.bind('<Double-1>', lambda e: l.configure(text='Double clicked'))
l.bind('<B3-Motion>', lambda e: l.configure(text='right button drag to %d,%d' % (e.x, e.y)))
root.mainloop()
The first three event bindings are pretty straightforward, just looking at simple events. The double click binding introduces the idea of an event modifier; in this case we want to trigger the event on a left mouse click (the "1"), but only when it's a double click (the "Double-").
The last binding also uses a modifier: capture mouse movement ("Motion"), but only when the right mouse button ("B3") is held down. This binding also shows an example of how to use event parameters, through the use of percent substitutions. Many events, such as mouse clicks or movement have as parameters additional information like the current position of the mouse. These percent substitutions let you capture them so they can be used in your script.
Tkx lets us provide command callbacks as just a Perl function (the first four), or as a two element array (the last case). The first element is the Perl code to be called, while the second array element specifies parameters to pass to that code. The function "Tkx::Ev()" will expand its parameter ("%x %y" in this case) when the callback is invoked, which will perform the percent substitutions. These then are passed as parameters to our function.
Tkinter expects you to provide a function as the event callback, whose first argument is an event object representing the event that triggered the callback. It's usually not worth the bother of defining regular named functions for one-off callbacks such as in this example, so we've just used Python's anonymous functions via lambda. The earlier feet to meters example used a regular defined function (calculate).
For a complete description of all the different event names, modifiers, and the different event parameters that are available with each, the best place to look is the "bind" command reference.
Virtual Events
Beyond the low-level operating system events like mouse clicks and window resizes, many widgets generate higher level events called virtual events. For example, a listbox widget will generate a "ListboxSelect" virtual event anytime the selection changes, regardless of whether that was because the user clicked on an item, moved to it with the arrow keys, or whatever. This avoids the problem of setting up multiple, possibly platform-specific event bindings to capture the change. Virtual events for a widget, if any, will be listed in the widget's documentation.
Multiple Bindings
Widgets can actually have a number of different event bindings trigger for a single event. Normally, events can be set up for: the individual widget itself, all widgets of a certain class (e.g. buttons), the toplevel window containing the widget, and all widgets in the application. Each of these will fire in sequence.
We saw this in our example when we set up a binding for the Return key on the toplevel window, and that applied to every widget within that window.
The default behavior of each widget class in Tk is itself defined with script-level event bindings, and so can be introspected and modified to alter the behavior of all widgets of a certain class. You can even completely modify the handling of this multiple sequence of events for each widget; see the "bindtags" command reference if you're curious.