
 If you've found the material on this site useful, please consider purchasing this
e-book (only $10), which is based on the Python material in the tutorial. Doing so helps me
maintain and update this site. Thank you very much!
If you've found the material on this site useful, please consider purchasing this
e-book (only $10), which is based on the Python material in the tutorial. Doing so helps me
maintain and update this site. Thank you very much!
@markroseman
mark@markroseman.com
 Buy now for your Kindle
 Buy the DRM-free PDF
Essentials
- Tk Backgrounder
- Installing Tk
- Tutorial
- Widget Roundup
- Languages Using Tk
- Official Tk Command Reference
(Tcl-oriented; at www.tcl.tk)
Tutorial
A First (Real) Example
With that out of the way, let's try a slightly more useful example, which will give you an initial feel for what the code behind a Tk program looks like.
Design
The example we'll use is a simple GUI tool that will convert a number of feet to the equivalent number of meters. If we were to sketch this out, it might look something like this:
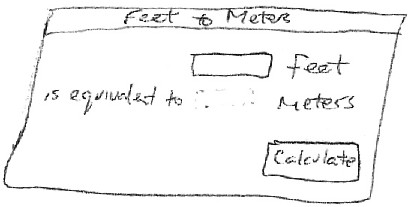
A sketch of our feet to meters conversion program.
So it looks like we have a short text entry widget that will let us type in the number of feet, and a 'Calculate' button that will get the value out of that entry, perform the calculation, and then put the resulting number of meters on the screen just below where the entry is. We've also got three static labels ("feet", "is equivalent to", and "meters") which help our user figure out how to use the interface.
In terms of layout, things seem to naturally divide into three columns and three rows:
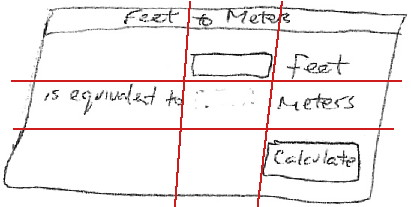
The layout of our user interface, which follows a 3 x 3 grid.
Code
Now here is the Tcl/Tk code to create this program.
package require Tk

wm title . "Feet to Meters"
grid [ttk::frame .c -padding "3 3 12 12"] -column 0 -row 0 -sticky nwes
grid columnconfigure . 0 -weight 1; grid rowconfigure . 0 -weight 1

grid [ttk::entry .c.feet -width 7 -textvariable feet] -column 2 -row 1 -sticky we
grid [ttk::label .c.meters -textvariable meters] -column 2 -row 2 -sticky we
grid [ttk::button .c.calc -text "Calculate" -command calculate] -column 3 -row 3 -sticky w

grid [ttk::label .c.flbl -text "feet"] -column 3 -row 1 -sticky w
grid [ttk::label .c.islbl -text "is equivalent to"] -column 1 -row 2 -sticky e
grid [ttk::label .c.mlbl -text "meters"] -column 3 -row 2 -sticky w

foreach w [winfo children .c] {grid configure $w -padx 5 -pady 5}
focus .c.feet
bind . <Return> {calculate}

proc calculate {} {
   if {[catch {
       set ::meters [expr {round($::feet*0.3048*10000.0)/10000.0}]
   }]!=0} {
       set ::meters ""
   }
}
Now here is the RubyTk code to create this program.
require 'tk'
require 'tkextlib/tile'

root = TkRoot.new {title "Feet to Meters"}
content = Tk::Tile::Frame.new(root) {padding "3 3 12 12"}.grid( :sticky => 'nsew')
TkGrid.columnconfigure root, 0, :weight => 1; TkGrid.rowconfigure root, 0, :weight => 1

$feet = TkVariable.new; $meters = TkVariable.new
f = Tk::Tile::Entry.new(content) {width 7; textvariable $feet}.grid( :column => 2, :row => 1, :sticky => 'we' )
Tk::Tile::Label.new(content) {textvariable $meters}.grid( :column => 2, :row => 2, :sticky => 'we');
Tk::Tile::Button.new(content) {text 'Calculate'; command {calculate}}.grid( :column => 3, :row => 3, :sticky => 'w')

Tk::Tile::Label.new(content) {text 'feet'}.grid( :column => 3, :row => 1, :sticky => 'w')
Tk::Tile::Label.new(content) {text 'is equivalent to'}.grid( :column => 1, :row => 2, :sticky => 'e')
Tk::Tile::Label.new(content) {text 'meters'}.grid( :column => 3, :row => 2, :sticky => 'w')

TkWinfo.children(content).each {|w| TkGrid.configure w, :padx => 5, :pady => 5}
f.focus
root.bind("Return") {calculate}

def calculate
  begin
     $meters.value = (0.3048*$feet*10000.0).round()/10000.0
  rescue
     $meters.value = ''
  end
end

Tk.mainloop
Now here is the Perl code to create this program.
use Tkx;

Tkx::wm_title(".", "Feet to Meters");
Tkx::ttk__frame(".c",  -padding => "3 3 12 12");
Tkx::grid( ".c", -column => 0, -row => 0, -sticky => "nwes");
Tkx::grid_columnconfigure( ".", 0, -weight => 1);
Tkx::grid_rowconfigure(".", 0, -weight => 1);

Tkx::ttk__entry(".c.feet", -width => 7, -textvariable => \$feet);
Tkx::grid(".c.feet", -column => 2, -row => 1, -sticky => "we");
Tkx::ttk__label(".c.meters", -textvariable => \$meters);
Tkx::grid(".c.meters", -column => 2, -row => 2, -sticky => "we");
Tkx::ttk__button(".c.calc", -text => "Calculate", -command => sub {calculate();});
Tkx::grid(".c.calc", -column => 3, -row => 3, -sticky => "w");

Tkx::grid( Tkx::ttk__label(".c.flbl", -text => "feet"), -column => 3, -row => 1, -sticky => "w");
Tkx::grid( Tkx::ttk__label(".c.islbl", -text => "is equivalent to"), -column => 1, -row => 2, -sticky => "e");
Tkx::grid( Tkx::ttk__label(".c.mlbl", -text => "meters"), -column => 3, -row => 2, -sticky => "w");

foreach (Tkx::SplitList(Tkx::winfo_children(".c"))) {
    Tkx::grid_configure($_, -padx => 5, -pady => 5);
}
Tkx::focus(".c.feet");
Tkx::bind(".", "<Return>", sub {calculate();});

sub calculate {
   $meters = int(0.3048*$feet*10000.0+.5)/10000.0 || '';
}

Tkx::MainLoop();
As we'll see in the next chapter, there's another, more object-oriented way to do exactly the same thing. Are we surprised?
Now here is the Python code to create this program.
from tkinter import *
from tkinter import ttk

def calculate(*args):
    try:
        value = float(feet.get())
        meters.set((0.3048 * value * 10000.0 + 0.5)/10000.0)
    except ValueError:
        pass

root = Tk()
root.title("Feet to Meters")

mainframe = ttk.Frame(root, padding="3 3 12 12")
mainframe.grid(column=0, row=0, sticky=(N, W, E, S))
mainframe.columnconfigure(0, weight=1)
mainframe.rowconfigure(0, weight=1)

feet = StringVar()
meters = StringVar()

feet_entry = ttk.Entry(mainframe, width=7, textvariable=feet)
feet_entry.grid(column=2, row=1, sticky=(W, E))

ttk.Label(mainframe, textvariable=meters).grid(column=2, row=2, sticky=(W, E))
ttk.Button(mainframe, text="Calculate", command=calculate).grid(column=3, row=3, sticky=W)

ttk.Label(mainframe, text="feet").grid(column=3, row=1, sticky=W)
ttk.Label(mainframe, text="is equivalent to").grid(column=1, row=2, sticky=E)
ttk.Label(mainframe, text="meters").grid(column=3, row=2, sticky=W)

for child in mainframe.winfo_children(): child.grid_configure(padx=5, pady=5)

feet_entry.focus()
root.bind('<Return>', calculate)

root.mainloop()
And the resulting user interface:
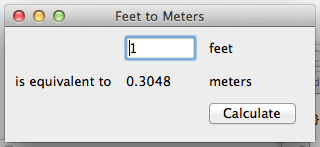
Screenshot of our completed feet to meters user interface (on Mac OS X, Windows and Linux).
A Note on Coding Style
Each of the languages included in this tutorial has a variety of coding styles and conventions available to choose from, which help determine conventions for variable and function naming, procedural, functional or object-oriented styles, and so on.
Because the focus on this tutorial is Tk, this tutorial will keep things as simple as possible, generally using a very direct coding style, rather than wrapping up most of our code in procedures, modules, objects, classes and so on. As much as possible, you'll also see the same names for objects, variables, etc. used across the languages for each example.
Step-by-Step Walkthrough
Let's take a closer look at that code, piece by piece. For now, all we're trying to do is get a basic understanding of the types of things we need to do to create a user interface in Tk, and roughly what those things look like. We'll go into details later.
package require Tk
First thing we do is tell Tcl that our program needs Tk. Though not strictly necessary, it's considered good form to include this line. It can also be used to specify exactly what version of Tk is needed.
require 'tk'
require 'tkextlib/tile'
These two lines tell Ruby that our program needs two packages. The first, "tk", is the Ruby binding to Tk, which when loaded also causes the existing Tk library on your system to be loaded. The second, "tkextlib/tile", is Ruby Tk's binding to the newer "themed widgets" that were added to Tk in 8.5.
The themed widget set evolved out of an earlier Tk add-on called Tile, hence the nomenclature. Despite that, the Tk::Tile::* calls you'll see in the programs are actually using the proper ttk versions in 8.5. Expect this to get better rationalized in the future.
use Tkx;
The first thing that we need to do is tell Perl to load the "Tkx" module, which provides the Perl interface to Tk that we are using.
As mentioned here, there are other Perl bindings to Tk. However, we very strongly recommend using Tkx for development, and that will be the only binding we will be describing here. Tkx has the advantage of being a very thin layer above Tk's native Tcl API, which means that in almost all cases it automatically tracks the latest changes to Tk (something which became a considerable issue with Perl/Tk, which was extremely popular in earlier years, but has not been recently updated). As well, by avoiding introducing another layer of code, API errors are reduced, and we can also take advantage of available reference documentation for Tk (which is usually Tcl oriented).
from tkinter import *
from tkinter import ttk
These two lines tell Python that our program needs two modules. The first, "tkinter", is the standard binding to Tk, which when loaded also causes the existing Tk library on your system to be loaded. The second, "ttk", is Python's binding to the newer "themed widgets" that were added to Tk in 8.5.
Notice that we've imported everything from the tkinter module, so that we can call tkinter functions etc. without prefixing them, which is standard Tkinter practice. However, because we've imported just "ttk" itself, that means we'll need to prefix anything inside that module. So for example calling "Entry(...)" would invoke the function inside the tkinter module, while we'd need "ttk.Entry(...)" to invoke the function inside ttk. As you'll see, several functions are defined in both modules, and sometimes you will need both, depending on the context. Making the ttk calls explicit facilitates this, and will be the style used in this tutorial.
One of the first things you'll find if you're migrating new code over, is that the name of the Tkinter module is now lowercase, i.e. "tkinter", rather than "Tkinter". This was changed as of Python 3.0.
wm title . "Feet to Meters"
grid [ttk::frame .c -padding "3 3 12 12"] -column 0 -row 0 -sticky nwes
grid columnconfigure . 0 -weight 1; grid rowconfigure . 0 -weight 1
root = TkRoot.new {title "Feet to Meters"}
content = Tk::Tile::Frame.new(root) {padding "3 3 12 12"}.grid(:sticky => 'nsew')
TkGrid.columnconfigure root, 0, :weight => 1; TkGrid.rowconfigure root, 0, :weight => 1
Tkx::wm_title(".", "Feet to Meters");
Tkx::ttk__frame(".c",  -padding => "3 3 12 12");
Tkx::grid( ".c", -column => 0, -row => 0, -sticky => "nwes");
Tkx::grid_columnconfigure( ".", 0, -weight => 1);
Tkx::grid_rowconfigure(".", 0, -weight => 1);
root = Tk()
root.title("Feet to Meters")
mainframe = ttk.Frame(root, padding="3 3 12 12")
mainframe.grid(column=0, row=0, sticky=(N, W, E, S))
mainframe.columnconfigure(0, weight=1)
mainframe.rowconfigure(0, weight=1)
Yes, the "calculate" function appeared before this. We'll describe it down below, but need to include it near the start because we reference it in other parts of the program.
Next, the above lines set up the main window, giving it the title "Feet to Meters". Next, we create a frame widget, which will hold all the content of our user interface, and place that in our main window. The "columnconfigure"/"rowconfigure" bits just tell Tk that if the main window is resized, the frame should expand to take up the extra space.
Strictly speaking, we could just put the other parts of our interface directly into the main root window, without the intervening content frame. However, the main window isn't itself part of the "themed" widgets, so its background color wouldn't match the themed widgets we will put inside it. Using a "themed" frame widget to hold the content ensures that the background is correct.
grid [ttk::entry .c.feet -width 7 -textvariable feet] -column 2 -row 1 -sticky we
grid [ttk::label .c.meters -textvariable meters] -column 2 -row 2 -sticky we
grid [ttk::button .c.calc -text "Calculate" -command calculate] -column 3 -row 3 -sticky w
$feet = TkVariable.new; $meters = TkVariable.new
f = Tk::Tile::Entry.new(content) {width 7; textvariable $feet}.grid( :column => 2, :row => 1, :sticky => 'we' )
Tk::Tile::Label.new(content) {textvariable $meters}.grid( :column => 2, :row => 2, :sticky => 'we');
Tk::Tile::Button.new(content) {text 'Calculate'; command {calculate}}.grid( :column => 3, :row => 3, :sticky => 'w')
Tkx::ttk__entry(".c.feet", -width => 7, -textvariable => \$feet);
Tkx::grid(".c.feet", -column => 2, -row => 1, -sticky => "we");
Tkx::ttk__label(".c.meters", -textvariable => \$meters);
Tkx::grid(".c.meters", -column => 2, -row => 2, -sticky => "we");
Tkx::ttk__button(".c.calc", -text => "Calculate", -command => sub {calculate();});
Tkx::grid(".c.calc", -column => 3, -row => 3, -sticky => "w");
feet = StringVar()
meters = StringVar()
feet_entry = ttk.Entry(mainframe, width=7, textvariable=feet)
feet_entry.grid(column=2, row=1, sticky=(W, E))
ttk.Label(mainframe, textvariable=meters).grid(column=2, row=2, sticky=(W, E))
ttk.Button(mainframe, text="Calculate", command=calculate).grid(column=3, row=3, sticky=W)
The preceding lines create the three main widgets in our program: the entry where we type the number of feet in, a label where we put the resulting number of meters, and the calculate button that we press to perform the calculation.
For each of the three widgets, we need to do two things: create the widget itself, and then place it onscreen. All three widgets, which are 'children' of our content window are created as instances of one of Tk's themed widget classes. At the same time as we create them, we give them certain options, such as how wide the entry is, the text to put inside the Button, etc. The entry and label each are assigned a mysterious "textvariable"; we'll see what that does shortly.
If the widgets are just created, they won't automatically show up on screen, because Tk doesn't know how you want them to be placed relative to other widgets. That's what the "grid" part does. Remembering the layout grid for our application, we place each widget in the appropriate column (1, 2 or 3), and row (also 1, 2 or 3). The "sticky" option says how the widget would line up within the grid cell, using compass directions. So "w" (west) means anchor the widget to the left side of the cell, "we" (west-east) means anchor it to both the left and right sides, and so on.
grid [ttk::label .c.flbl -text "feet"] -column 3 -row 1 -sticky w
grid [ttk::label .c.islbl -text "is equivalent to"] -column 1 -row 2 -sticky e
grid [ttk::label .c.mlbl -text "meters"] -column 3 -row 2 -sticky w
Tk::Tile::Label.new(content) {text 'feet'}.grid( :column => 3, :row => 1, :sticky => 'w')
Tk::Tile::Label.new(content) {text 'is equivalent to'}.grid( :column => 1, :row => 2, :sticky => 'e')
Tk::Tile::Label.new(content) {text 'meters'}.grid( :column => 3, :row => 2, :sticky => 'w')
Tkx::grid( Tkx::ttk__label(".c.flbl", -text => "feet"), -column => 3, -row => 1, -sticky => "w");
Tkx::grid( Tkx::ttk__label(".c.islbl", -text => "is equivalent to"), -column => 1, -row => 2, -sticky => "e");
Tkx::grid( Tkx::ttk__label(".c.mlbl", -text => "meters"), -column => 3, -row => 2, -sticky => "w");
ttk.Label(mainframe, text="feet").grid(column=3, row=1, sticky=W)
ttk.Label(mainframe, text="is equivalent to").grid(column=1, row=2, sticky=E)
ttk.Label(mainframe, text="meters").grid(column=3, row=2, sticky=W)
The above three lines do exactly the same thing for the three static text labels in our user interface; create each one, and place it onscreen in the appropriate cell in the grid.
foreach w [winfo children .c] {grid configure $w -padx 5 -pady 5}
focus .c.feet
bind . <Return> {calculate}
TkWinfo.children(content).each {|w| TkGrid.configure w, :padx => 5, :pady => 5}
f.focus
root.bind("Return") {calculate}
foreach (Tkx::SplitList(Tkx::winfo_children(".c"))) { Tkx::grid_configure($_, -padx => 5, -pady => 5); }
Tkx::focus(".c.feet");
Tkx::bind(".", "<Return>", sub {calculate();});
for child in mainframe.winfo_children(): child.grid_configure(padx=5, pady=5)
feet_entry.focus()
root.bind('<Return>', calculate)
The preceeding three lines help put some nice finishing touches on our user interface.
The first line walks through all of the widgets that are children of our content frame, and adds a little bit of padding around each, so they aren't so scrunched together. We could have added these options to each "grid" call when we first put the widgets onscreen, but this is a nice shortcut.
The second line tells Tk to put the focus on our entry widget. That way the cursor will start in that field, so the user doesn't have to click in it before starting to type.
The third line tells Tk that if the user presses the Return key (Enter on Windows) anywhere within the root window, that it should call our calculate routine, the same as if the user pressed the Calculate button.
proc calculate {} {
   if {[catch {
       set ::meters [expr {round($::feet*0.3048*10000.0)/10000.0}]
   }]!=0} {
       set ::meters ""
   }
}
def calculate
  begin
     $meters.value = (0.3048*$feet*10000.0).round()/10000.0
  rescue
     $meters.value = ''
  end
end
sub calculate {
   $meters = int(0.3048*$feet*10000.0+.5)/10000.0 || '';
}
def calculate(*args):
try:
value = float(feet.get())
meters.set((0.3048 * value * 10000.0 + 0.5)/10000.0)
except ValueError:
pass
Here we define our calculate procedure, which is called either when the user presses the Calculate button, or hits the Return key. It performs the feet to meters calculation, taking the number of feet from our entry widget, and placing the result in our label widget.
Say what? It doesn't look like we're doing anything with those widgets! Here's where the magic "textvariable" options we specified when creating the widgets come into play. We specified the global variable "feet" as the textvariable for the entry, which means that anytime the entry changes, Tk will automatically update the global variable feet. Similarly, if we explicitly change the value of a textvariable associated with a widget (as we're doing for "meters" which is attached to our label), the widget will automatically be updated with the current contents of the variable. Slick.
Tk.mainloop
This final line tells Tk to enter its event loop, which is needed to make everything run.
Tkx::MainLoop();
This final line tells Tk to enter its event loop, which is needed to make everything run.
root.mainloop()
This final line tells Tk to enter its event loop, which is needed to make everything run.
What's Missing
It's also worth examing what we didn't have to include in our Tk program to make it work. For example:
- we didn't have to worry about redrawing the screen as things changed
- we didn't have to worry about parsing and dispatching events, hit detection, or handling events on each widget
- we didn't have to provide a lot of options when we created widgets; the defaults seemed to take care of most things, and so we only had to change things like the text the button displayed
- we didn't have to write complex code to get and set the values of simple widgets; we just attached them to variables
- we didn't have to worry about what happens when the user closes the window or resizes it
- we didn't need to write extra code to get this all to work cross-platform